
One of the reasons you might be using the OpenETC WordPress service is so that you can share your work publicly on the open web. However, there may be times when you want to restrict who can see your work, and WordPress offers you quite a lot of control and choice when it comes to managing privacy.
- You can make individual posts or pages private, perhaps to share them only with a select group, or to get feedback on drafts before making them public.
- You can also make your entire site private, restricting it to all logged in users of Opened.ca, or right down to a select group of users that you choose.
Remember that you can change any of these options at any time. So you can start off fully locked down and work your way up to opening up your site, but perhaps still keeping the odd post here and there more private. It’s up to you to work out what you are most comfortable with.
Making an Individual Post or Page Private
The simplest way to make an individual post or page private on your site is to make it password protected. Only people who know the password you choose will be able to access it.
- Edit your post or page (or start a new post or page).
- In the Publish box on the right-hand side of the screen, click the Edit link next to Visibility: Public.
- Select Password protected and type in a Password.
- Click OK.
- Click Update (Save Draft or Publish if this is a new page) to save your changes.
- Share the password you set with anyone you want to see this post or page.
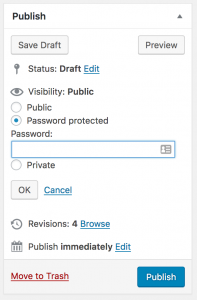
You can also restrict an individual post or page so that it is only visible to logged in users of your site. Using this option means you will also need to add each person that you want to have access as a named user of your site.
- Edit your post or page (or start a new post or page).
- In the Publish box on the right-hand side of the screen, click the Edit link next to Visibility: Public.
- Select Private.
- Click OK.
- Click Update (Save Draft or Publish if this is a new page) to save your changes.
- Use Dashboard > Users to add the people that you want to have access to Private posts or pages.
Remember that the only people you will be able to add as registered users of your site are people with a valid BC post-secondary email address. In practice that probably means your teacher, colleagues, or fellow students.
Making a Whole Site Private
You have a few choices about how private you want your site to be. You might find that the template your site was created from has a default setting of more or less privacy, so it’s worth being aware of your choices here.
- Go to your site Dashboard
- From the left-hand menu, choose Settings > Reading
- In the Site Visibility section, choose one of the following options:
- Visible only to registered users of this network
Choosing this option will mean only people who are logged into Opened.ca will be able to see your site. Remember that Opened.ca is used by members from across a number of Universities and education organisations, not just people from your University or College. This option can be a nice balance of privacy in that you are private to a community of other users probably quite like you. - Visible only to registered users of this site
Choosing this option will mean only people who are set up by you as users on your site will be able to see anything. This is the option with the most privacy and allows you the most control. This might be the best way to start if you are writing about sensitive topics, or just finding your feet.Remember that the only people you will be able to add as registered users of your site are people with a valid BC post-secondary email address. In practice that probably means your teacher, colleagues, or fellow students.
- Click Save Changes.
- Your site will be updated immediately to your new privacy preference.
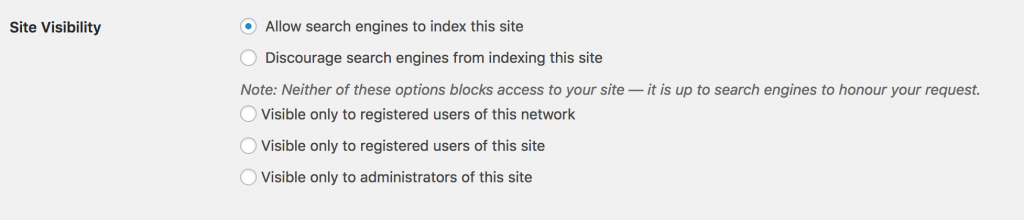
Making a Whole Site Open
As well as carefully restricting access to your work, using the options above, you always have the option to open your site right up and share with the world.
- Go to your site Dashboard
- From the left-hand menu, choose Settings > Reading
- In the Site Visibility section, choose one of the following options:
- Allow search engines to index this site
Choosing this option will mean your site is open to the world and if someone searches for your site using Google, Bing, DuckDuckGo etc it’s quite likely that they will find it. - Discourage search engines from indexing this site
Choosing this option will mean your site is open to the world, but search engines are discouraged from making it easy to find. This isn’t foolproof though. If you really want privacy then look at some of the other options above.
- Click Save Changes.
- Your site will be updated immediately to your new privacy preference.
Image Credit: Private Barrels flickr photo by cogdogblog shared under a Creative Commons (BY) license
